(Finals are coming and it's terrifying how much time I won't have)
But anyway, it took me two weekends at home and a lot of patience, and I finally got to use the lovely fox material I bought off the internet last semester. (Expecting a little but I didn't get one) This purchase also led to a long stream of credit card fraud and my identity being stolen, but it was dang well worth it.
I originally followed this tutorial off pinterest, but it did not work for me very well. I don't know if I did it wrong or what, but I busted some seams and had to try again.
http://sweet-verbena.blogspot.com/2012/06/color-block-tank-dress-tutorial.html
Needs:
Main fabric, I think I used about a yard and a half? I can't even remember how much I ordered since I bought it last semester. Get two yards just to make sure.
Accent fabric for the sash (optional), 1/2 yard
Hem fusing tape and iron (optional if you don't want to sew the hem)
Tanktop
Clear elastic
Round 1:
I took a white tanktop and tried it on. With it on: I held up my fabric, still doubled, and wrapped it around me like a skirt. I then moved it up and down to determine how long I wanted the skirt to be. Then, I marked that spot where the fabric met the tanktop with a pencil line. This is where I cut it off. Do remember to leave a little bit of allowance for the hemming and sewing. It will end up a little bit shorter than you measured. Mine is pretty short, but that's the way I like them.
 |
| This is my fabric of choice. It's called "Backyard Bandits", and there's a whole series of them featuring different animals. |
 |
| My tanktop cut off, next to my other fabrics. |
Next, I sewed the clear elastic to the tanktop bottom where I cut it off, just like in Sweet Verbena's tutorial. I cut off my fabric after measuring the tanktop, 12 inches past where the tanktop stopped. You should have two panels the same. With my printed fabric, I had to make sure the print was going the right way. I then proceeded to sew the two sides of the panels together. Make sure you do this with the print on the two panels facing each other, in essence "inside out" so your seam is on the inside. The top of the skirt part was then gathered by pulling one long piece of thread through each side, and scrunching it up in a relatively uniform manner. I didn't take the time to put pockets in my dress, by the way.
After gathering the skirt, I pinned it with the seam of the skirt and tanktop lining up. (You wouldn't want it to be crooked) I put the tanktop upside down in the skirt, with the tanktop right side out and the skirt part inside out.I then sewed across the entire joining of the two several times and did so just below the elastic on the tanktop. If you sew above it the elastic will show when you put the dress on.
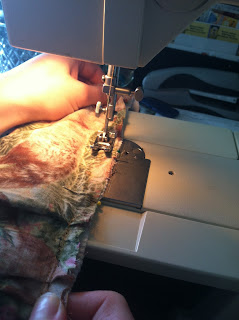
This method didn't work. I couldn't get into the dress because it wouldn't stretch enough. So my grandma, being the kind lady she is, took out the triple seam I'd put in at the skirt/tanktop join for me. I resewed it together, this time pinning it while stretched as far as it could go. Once I let go, it shrunk back and looked gathered again. Sew it on the machine, while stretching the fabric out as much as you possibly can, like this:
 |
| Before sewing, on the machine unstretched. |
 |
| While sewing, stretched as far as the tanktop would allow. |
Now for the hem, I used a fusing hem tape my grandma gave me. It looks like this:
I cut sections of this to fit the two sides of my dress, and laid it along the very bottom of the skirt on the inside.
Next, I folded it over so that it was halved, and ironed it so that the heat melted the fusing stuff and created a permanent bond.
After that, the dress itself was completed, and I moved on to the sash!
My sash was a quarter yard of fabric in a russet orange color, but I recommend using a half yard for anyone else. It's barely long enough, and I'm kind of tiny. I sewed it to make a long tube at the width I wanted it, and then ironed it out so it lay flat. Next, I cut a triangle out of each end to make it look like a ribbon and used the hem fusing stuff to seal the tube up. And that was that. It was the easiest part of the whole thing.
And my dress was finally finished! Two weekends of hard labor finally paid off when I got to wear it and take pictures with my sweet puppy.
 |
| Me and the adorable shepherd mix that stole my heart. |
 |
| Back of the dress, showing the bow. |
 |
| Just me in a tree, turns out dogs aren't very cooperative sometimes. |


No comments:
Post a Comment