Tuesday, April 23, 2013

"Foxy" Summer Dress

This is probably the biggest craft I have ever undertaken. I happen to be a terrible seamstress, which is pitiful because it runs in my family. My great great grandmother was a professional seamstress and my great grandma (who lives with me) is a fantastic seamstress as well, having been taught by her mom. After my grandma, the sewing gene seems to have decided we weren't worth it anymore. However, this happens to be my favorite and best accomplishment so far, below my nautical bid day dinner which will be posted soon.

(Finals are coming and it's terrifying how much time I won't have)

But anyway, it took me two weekends at home and a lot of patience, and I finally got to use the lovely fox material I bought off the internet last semester. (Expecting a little but I didn't get one) This purchase also led to a long stream of credit card fraud and my identity being stolen, but it was dang well worth it.

I originally followed this tutorial off pinterest, but it did not work for me very well. I don't know if I did it wrong or what, but I busted some seams and had to try again.

http://sweet-verbena.blogspot.com/2012/06/color-block-tank-dress-tutorial.html

Needs:
Main fabric, I think I used about a yard and a half? I can't even remember how much I ordered since I bought it last semester. Get two yards just to make sure.
Accent fabric for the sash (optional), 1/2 yard
Hem fusing tape and iron (optional if you don't want to sew the hem)
Tanktop
Clear elastic

Round 1:
I took a white tanktop and tried it on. With it on: I held up my fabric, still doubled, and wrapped it around me like a skirt. I then moved it up and down to determine how long I wanted the skirt to be. Then, I marked that spot where the fabric met the tanktop with a pencil line. This is where I cut it off. Do remember to leave a little bit of allowance for the hemming and sewing. It will end up a little bit shorter than you measured. Mine is pretty short, but that's the way I like them.
This is my fabric of choice. It's called "Backyard Bandits",
 and there's a whole series of them featuring different animals.

My tanktop cut off, next to my other fabrics.


Next, I sewed the clear elastic to the tanktop bottom where I cut it off, just like in Sweet Verbena's tutorial. I cut off my fabric after measuring the tanktop, 12 inches past where the tanktop stopped. You should have two panels the same. With my printed fabric, I had to make sure the print was going the right way. I then proceeded to sew the two sides of the panels together. Make sure you do this with the print on the two panels facing each other, in essence "inside out" so your seam is on the inside. The top of the skirt part was then gathered by pulling one long piece of thread through each side, and scrunching it up in a relatively uniform manner. I didn't take the time to put pockets in my dress, by the way.

After gathering the skirt, I pinned it with the seam of the skirt and tanktop lining up. (You wouldn't want it to be crooked) I put the tanktop upside down in the skirt, with the tanktop right side out and the skirt part inside out.I then sewed across the entire joining of the two several times and did so just below the elastic on the tanktop. If you sew above it the elastic will show when you put the dress on.

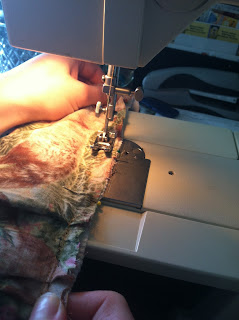
This method didn't work. I couldn't get into the dress because it wouldn't stretch enough. So my grandma, being the kind lady she is, took out the triple seam I'd put in at the skirt/tanktop join for me. I resewed it together, this time pinning it while stretched as far as it could go. Once I let go, it shrunk back and looked gathered again. Sew it on the machine, while stretching the fabric out as much as you possibly can, like this:
Before sewing, on the machine unstretched.

While sewing, stretched as far as the tanktop would allow.
This proved to have much better results, and I can get in and out of the dress effortlessly.

Now for the hem, I used a fusing hem tape my grandma gave me. It looks like this:
 I cut sections of this to fit the two sides of my dress, and laid it along the very bottom of the skirt on the inside.
 Next, I folded it over so that it was halved, and ironed it so that the heat melted the fusing stuff and created a permanent bond.
 After that, the dress itself was completed, and I moved on to the sash!
My sash was a quarter yard of fabric in a russet orange color, but I recommend using a half yard for anyone else. It's barely long enough, and I'm kind of tiny. I sewed it to make a long tube at the width I wanted it, and then ironed it out so it lay flat. Next, I cut a triangle out of each end to make it look like a ribbon and used the hem fusing stuff to seal the tube up. And that was that. It was the easiest part of the whole thing.
And my dress was finally finished! Two weekends of hard labor finally paid off when I got to wear it and take pictures with my sweet puppy.
Me and the adorable shepherd mix that stole my heart. 

Back of the dress, showing the bow.

Just me in a tree, turns out dogs aren't very cooperative sometimes.

Monday, April 15, 2013

Rubber Band Eggs and Melted Crayon Eggs

My final Easter crafts post! I'm excited to finally get through them...and then I realize that come Christmas season I'll be doing this deal all over again with my handmade ornaments from this last year. -_-

But anyway, I'm combining the last two because they're both really short. The first is rubber band eggs.
These are really simple. If you've got kids, this one can be done with just about any age level. If they're old enough to do Easter eggs, they're old enough to do these. The hardest part is being careful not to apply too much force when you're putting the rubber bands on or it will crack the eggs.

All you have to do is put the rubber bands on the eggs in the pattern you desire it, then dye as normal. Thicker rubber bands give you the ability to shape them into squiggles, like this:

Smaller rubber bands allow you to put more on there and create more lines, like my mom's natural silhouette egg from before. And that's it. I forgot mine in the dye, so it was really random. I just kept leaving it in different ones and forgetting about it. Oh well. I don't even have a picture of it because I let my mom mess with it. If you'd like to see the effect of the skinny rubber bands on an egg, take a look at my other post,
Natural Silhouette Eggs.

Next is crayon melty eggs. I did mine by holding my crayon (peeled to prevent fires) over a candle flame, and then dripping it on the egg. It turned out terrible.


So instead, I recommend using my mom's method. She covered hers in white crayon dots, then dyed it her first color. After that, she added more dots in the color of the first dye (in case the wax resist left a residue that was colored, she wanted it to match) and dipped it in another dye. After drying, she scratched off the dots and it looked awesome! What you get is the layering of three different colors, and it's really something amazing.

And then lastly, I'm not entirely sure what my sister did with hers, but I know she did the crayon and then dyed it. Here it is, just for posterity, even though I can't show you how to replicate it.

Wednesday, April 10, 2013

Natural Silhouette Eggs

For my natural leaf eggs, I used the tutorial mentioned in my very first Easter post. She does it with onion skins, I did it with regular dye. Here's the process I used!

Need:
White hardboiled eggs
Cheap pantyhose
Leaves of various shapes (Flatter ones work best)
Egg dye

If you like my mom's version (Which I'll show you), you need rubber bands too.

First off, I picked out some leaves. Ones that will lay flat along the egg work best, but I also used some baby's breath-like ones that produced a cool pattern and texture. Be creative, there's no telling how yours will turn out! I used trimmings 2-3 inches long.

Lay the leaves flat against the curve of the egg, where you'd like the relief to be positioned. I did mine right around the center. Then, carefully slip a section of the pantyhose (toes work best, but you can use leg sections and just put a knot on each end) over the egg, holding the leaf in place until you can press the pantyhose against it. Draw it as tight as you can, back towards the back of your egg. You should be able to see what I'm talking about in the picture. Once you get it nice and tight, tie it off in the back.
Christmas cactus leaf, tied off

After this step, the rest is a breeze. I let my first one soak in green, (and I used a light brown egg for this one instead of white, turned out pretty cool with the green), one soak in yellow and red, and one in blue and just a minute or so of green. I have no idea what my mom did to hers. My guess is green and yellow.

Dying the green one- Baby's breath
She secured her leaf to the egg using a billion rubber bands in every direction. It looked super silly, and I totally made fun of her for it, but it turned out great.
My mom's rubber band egg

After the dye was the color I wanted it, I pulled mine out and let them drip dry for a little bit. Then, I cut open the pantyhose under the knot on the back. This allowed me to carefully pull the pantyhose away and lift the egg up off the leaf and prevent smudging of color. Mom just let hers dry and then pulled the rubber bands off.

It's as simple as that! And they turned out gorgeous, and super earthy. For an organic look, these eggs are perfect.

Light brown egg, green dye, Baby's breath


Christmas cactus, orange & yellow dye


Back of Christmas cactus egg


Unknown plant, Blue & a little bit of green dye


Mom's rubber band egg

Friday, April 5, 2013

Easter Egg Post #2-Sprinkles and Happiness

In case you missed it, I love sprinkles. And glitter. And foxes.

But this post is about sprinkles. And using them to make a ridiculously cool Easter Egg that is safe to eat. Now, you can do the undercoat with real Easter egg dye, or you can do it "naturally" with more sprinkles for a cooler effect.

Needs:
White eggs, hardboiled
One egg white, obviously not hardboiled
A paint brush, medium sized, to brush on the egg white
Another brush, small, to brush off the sprinkles
Nonpareil sprinkles in the rainbow of colors
A little bit of patience

Optional:
Sugar crystal sprinkles, I used varying shades of pink

Now, originally, I was hoping that covering my egg in the plain sugar crystal sprinkles would achieve the effect that I wanted. I mixed hot pink, green, and light pink sugar crystals in a styrofoam plate thing. Next, I covered the egg in egg white and rolled it in the sprinkles. I let that sit for a good deal of time. The green sprinkles didn't even leave color on the egg when I brushed them off. Instead, I got a very light pink coating that looked like a watercolor. Now, this looked really nice for the background of my egg. You can try the regular egg dye instead, but I would recommend light colors regardless. Don't want to compete with too much color when you put the nonpareils on.

After my egg had dried from that failed attempt, I decided to try the nonpareil sprinkles. (My mom tried this, using vinegar to leach the color and pantyhose to hold the sprinkles around the egg. But let's be frank, it turned out terrible) I used a glob of play dough to form around the bottom of my egg to sit it in while I was working on it. This was very convenient, and provided me the ability to work lightly on the egg without touching it.

I started with a spot of egg white painted on the front of the egg. you want a medium layer. Not too thin, or the sprinkles won't stick, but not thick enough that it never dries ever. Sprinkle the nonpareils over the spot, and when full coverage on the spot is achieved, gently pat them down onto it with your finger. Now, this is important. Don't let it fully dry before the next part. The wetness is what drags the color across the egg.

Take your little paint brush, and after picking a "center" of your sprinkle spot, brush the sprinkles gently off and away from the center. Work around it in a circle. I'm not sure if I'm explaining this to the best of my ability, but you're basically forming a firework looking thing of sorts around that center spot. You can see from the picture how I brushed away from it. You're essentially using each sprinkle as a one stroke serving of paint. As if each nonpareil loaded your brush up with enough paint for one and only one line away from the center. After letting this dry a bit, rotate the egg and repeat the process until your egg is visually balanced. I ended up with four "fireworks".

Note: Don't worry about the fact that some of the nonpareils are white. It annoyed me at first, but then I realized that they kept the color from being TOO dense in each spot. If this is unclear, I apologize. I'm not sure how else to word it. Feel free to leave comments if you have questions, and hopefully I can answer them to the best of my ability.


Wednesday, April 3, 2013

Let the Easter Craft Posts Begin!

My family did a ton for Easter. In fact, my mom and I stayed up quite late perfecting our Easter Eggs. So, in a series of posts because they're all kind of long, I'm going to cover the various techniques I used to do my eggs this year. I spent a good deal of time looking up new things on Pinterest to try out, and selected several that I thought I would enjoy.

I did napkins painted on with egg white, following this tutorial here:
http://www.larecetadelafelicidad.com/en/2013/03/easter-eggs-napkins.html

I also used the egg white trick (which is natural and safer to eat than any glues and such that you might put on an egg) to do some fun with sprinkles, which happened to be my favorite of all my eggs. I'm dreading having to eat it soon.

I did a fun trick with pantyhose and leaves to make natural silhouette eggs, my second favorite of all the eggs. For that I followed the tutorial here:
http://scissorsandspoons.com/onion-skin-dyed-decorative-eggs-terra-cotta-colored-decorative-eggs/
without the onion skins. I used regular egg dye instead.

We used rubber bands to make designs on the eggs.

And then, of course, I had to melt crayons all over my eggs. My moms turned out the best out of these sets. (She's got a masters degree in art, so I expected nothing less)

I'm going to go through each of these one at a time, and I know it's past Easter, but at least you can try these out with less mistakes than me next year! (Or just for fun)

The first of all these was my egg yolk napkin deal.
You need:
Hard Boiled eggs
Patterned napkins
One egg, not hard boiled (the tutorial has listed a ton of egg white, but I found that I barely even used any of the one egg I cracked open. I left it intact and just dipped my brush avoiding the yolk)
A paint brush, preferably medium to large size

 It turned out pretty well, minus me not quite tearing off enough napkin. The tutorial said to cut the napkin into fourths, but since I was using a Pokemon patterned napkin, I tore off a large chunk with Pikachu as the centerpiece.

Like I said, I was using a Pokemon patterned napkin that my mommy picked up at a wholesale auction warehouse in bulk. We have have tons of them. It's super cute, and I could've picked any character to highlight, but the Pikachu was the right size and adorable. I also really liked the napkin she used in her tutorial, but I hadn't known that I was going to be doing this or I would've gone and picked some cool ones up from the store.

With a character or design, first decide what you want the focal point to be. Then, lay it out on the front of the egg, centered as you want it to show. Now, I didn't measure and just ripped, and ended up not having quite enough of the napkin to cover an egg. this happened to leave me with a very large spot on the back uncovered, and resulted in a large ugly patch of another section of napkin that didn't match. So, lesson learned, figure out exactly how much napkin you need. It's better to have extra that you can tear or cut off when you're done. There will be a seam of sorts at the back of the egg. There's really no way around this, but it doesn't look too bad in the end.

Make sure you take ONLY the printed layer of the napkin. Any other layers underneath are bulky and will prevent the napkin from completely sticking to the egg. Center your chunk where it needs to be, and then apply a bit of the egg white to wet it down to the egg. Then brush outward from that spot in a sunburst fashion. This keeps it as smooth as possible, and results in not tearing the napkin doing multiple strokes in different directions. I let mine dry in sections before continuing so that it was easier to hold on to when painting.

Allowing my egg to dry after brushing on the front of the design
When you reach the back, try to make sure your brush isn't too dry. If it's dry, there's more friction and it might end up tearing the napkin. Just brush everything as smoothly as possible towards the back of the egg into a seam, and then cover it up with a patch if you didn't have enough napkin or think that it doesn't look just right.

You can also use this method to put just cutout designs on the egg, using small chunks of napkin design. A decoupage would look nice as well, I think. Complete coverage, but no orderly fashion to the design. Here is mine:

FYI: If you have extra egg yolk left over at the end, and you have doggies, let them have whatever's left. It makes their coat shiny and is good for them overall. I gave mine to my sweet puppy, Leo.